
How to Collect and Manage Parental Permissions Using Orah
Kavyapriya Sethu
•
August 10, 2021
With the new school year starting soon, there are numerous activities for schools to plan and execute to create a memorable school experience for their students. Teachers are often tasked to get parents' consent or gather vital information about the students before schools can carry out any activity that involves the students. A few examples include permissions, additional medical notes, license numbers, visa details, approved drivers, class information, and communication accounts. It is also critical to communicate with the parents and ensure that they have a clear understanding of what is happening and how they can get involved, especially during a crisis like Covid-19.
Some schools use pen and paper to collect information. Later, they spend hours manually sorting and updating the responses onto their database. Other times, they use online tools and email to reach out to parents, but it still involves manual intervention to ensure that the data is rightly uploaded into the student database. It also leads to teachers suffering from inbox fatigue trying to keep up with a constant barrage of emails. It's not just that. It takes a significant amount of hours to figure out who is yet to submit the form and follow up with them.
Streamlining how you collect and manage permissions from parents is vital so you can focus on the places that need your attention most. And, Orah has just the solution for you. Here is an overview.
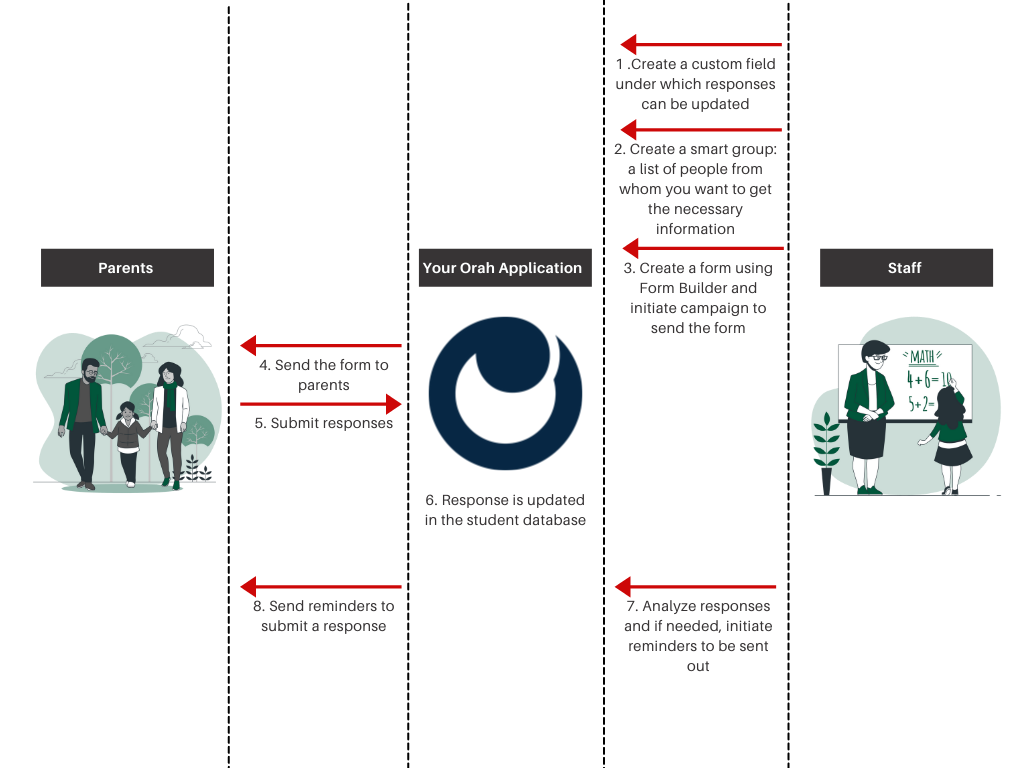
Now, let’s dive deeper into how to do each of these steps.
1. Create a custom student field
Do you want to get any medical information of the students from their parents? Or do you want to get parents' consent so that their child(ren) can take part in some school activity?
Decide the information you would like to gather and create a custom field in the student database. We are going to be sending forms to the parents, and the responses received will be updated under the custom field you are going to be creating. Here's how you can do it.
- Navigate to the Admin Console, and click on Students.
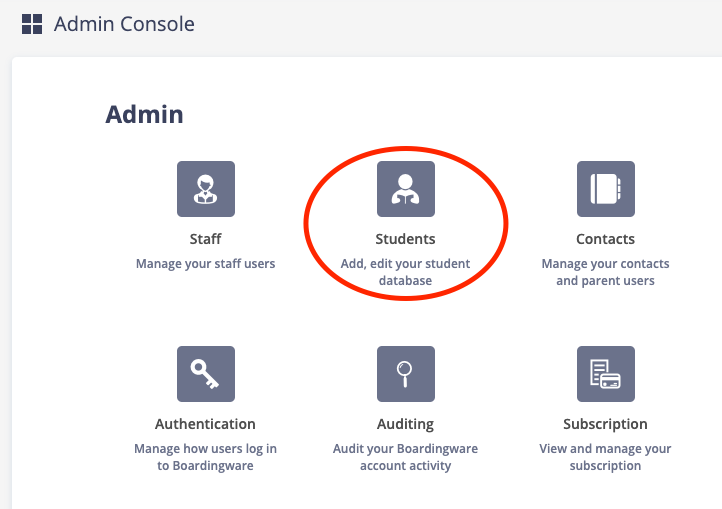
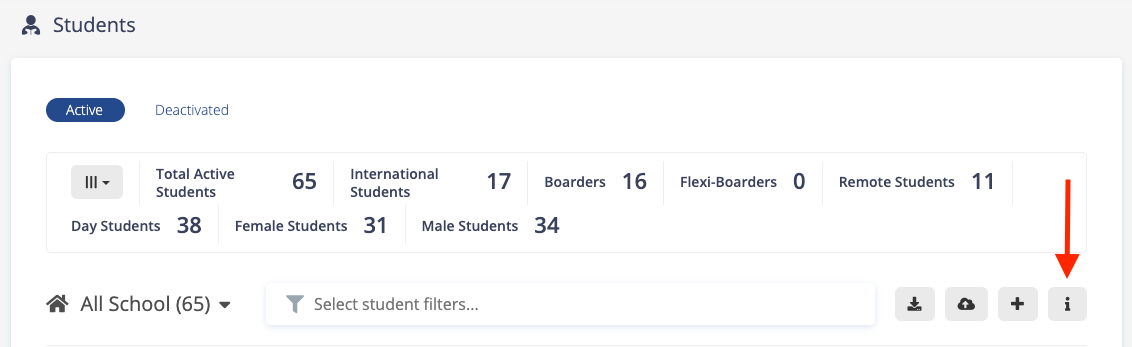
- Click on the i icon to add additional information.
- First, we will create a new category under which the custom field (that we will be creating) can be grouped. To create a new category, first, click on the + button (Add New Category icon) and type in the name of the category. Next, click on the Create button.

- Next to the category name, click on the Add New Field button.
- Select your field type. This is the preferred format of the input data.
- Give your custom field a name and click on Create.
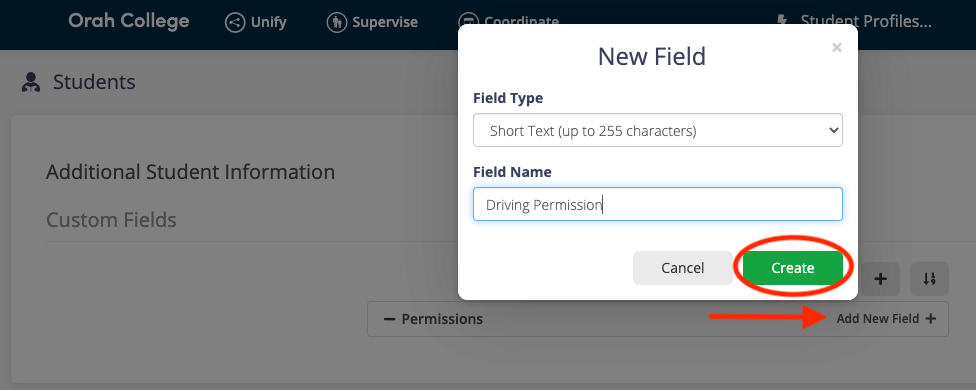
A custom field has been successfully created. You can view the field in each of the student profiles under the Student Database.
2. Create a school group
We are going to be using forms to gather the required information. But before we send it out, create a group with the list of people who need to fill out the form. Here's a step-by-step guide on how to create a smart group.
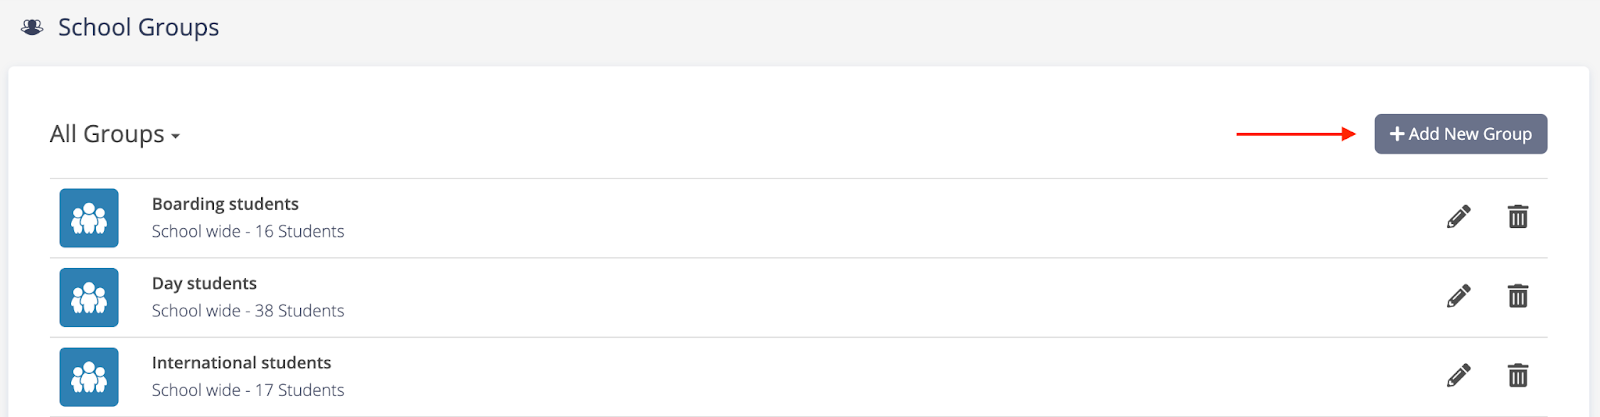
- Navigate to the Admin Console, and click on School Groups.

- Click on the Add New Group button on the top right. Here is what your screen should look like.
- Give the group a name, and specify the group type—applicable to the entire school or to a specific house.
- By default, you would see the smart group toggle button switched on. A smart group allows you to define conditions and smartly filter from your database to create the recipient list.
- Your filters can be a condition that matches ALL or ANY filter criteria. You then have to choose the student attribute and the value it has to match. Here is an example. Say you want to create a group for students in class 12 AND who are boarders so that you can send out a form to their parents and get their consent for allowing their child(ren) to a field trip. Here is how your page might look like.
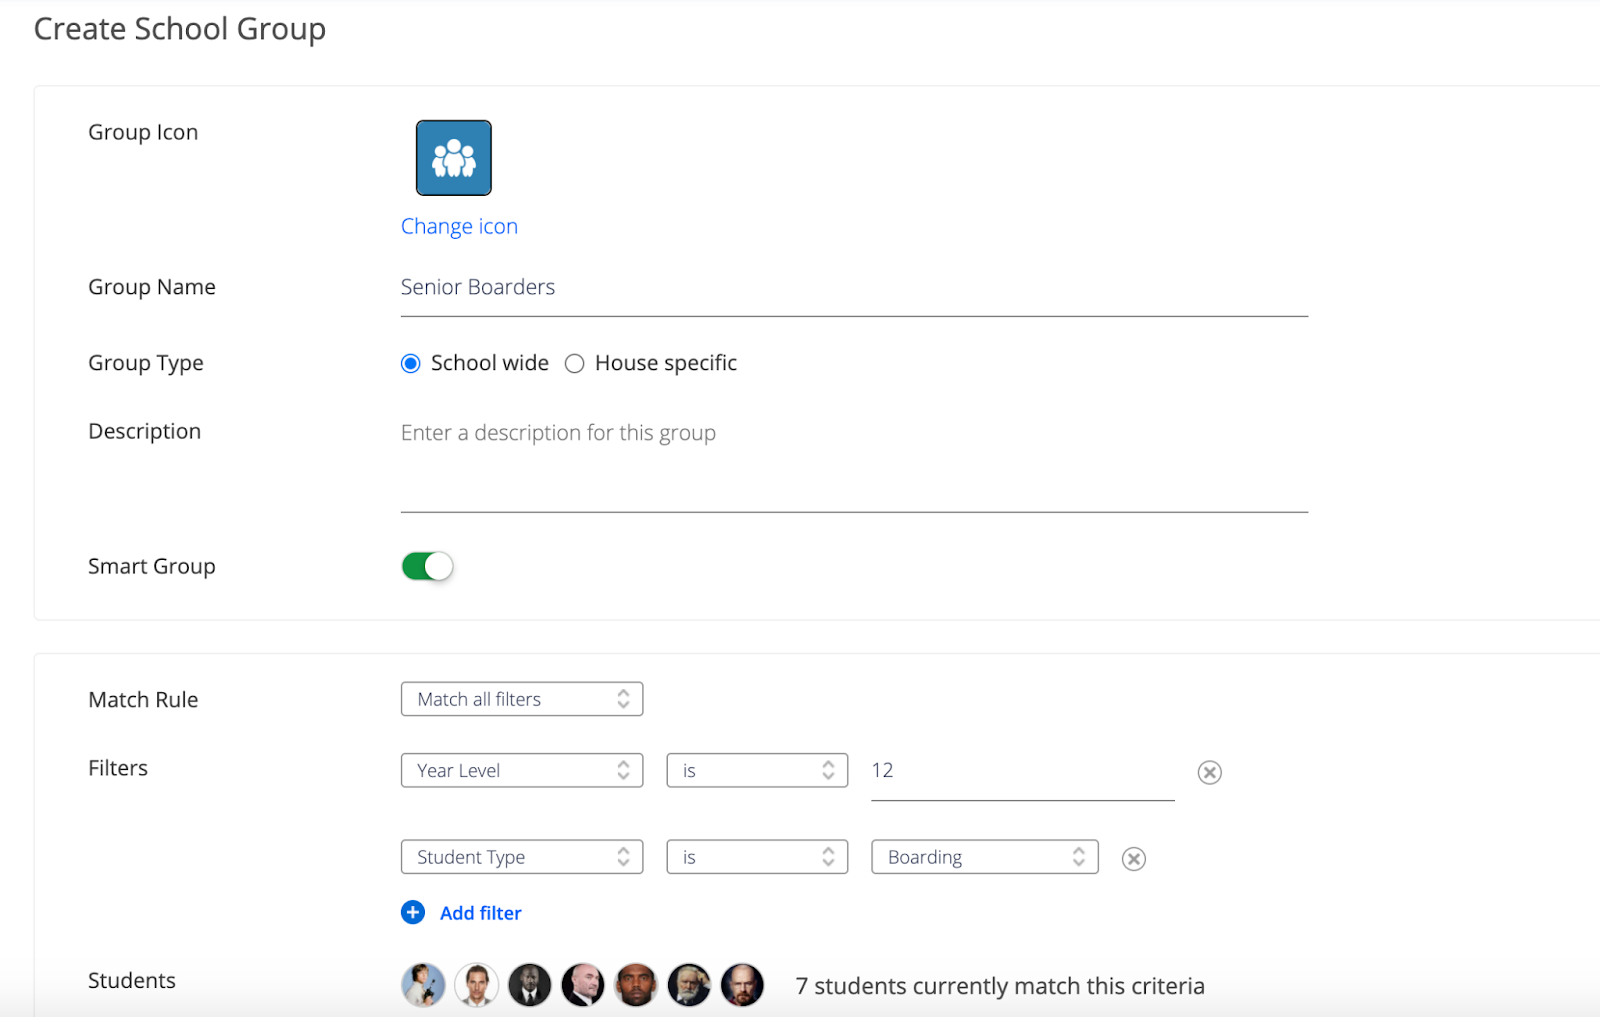
A smart group has been successfully created.
3. Create a form
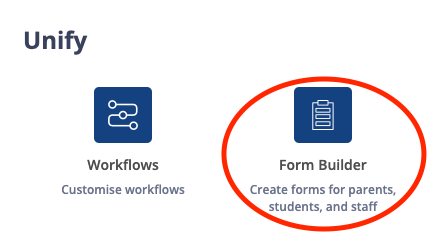
The form builder is a feature included within the Unify product that enables you to create online forms in a matter of seconds. Here is how you can easily create your desired form to be sent out.
- To create a form for the first time, navigate to the Admin Console and click on the Form Builder under the Unify tab.
- If a form has already been created, you can see it under the grouped folder and view whether it is active or not. By clicking on the three vertical lines against a form, you can click on Copy to make a copy of the form and customize it to your need.
- If there aren't any forms already available or if there aren't any forms that suit your need, you can create a new one by clicking on the + New Form button.
- Next, you have to choose who is the form for. In this case, select parents.

- Give the form a name and description. The details you give here are what will be seen by parents when submitting the form.
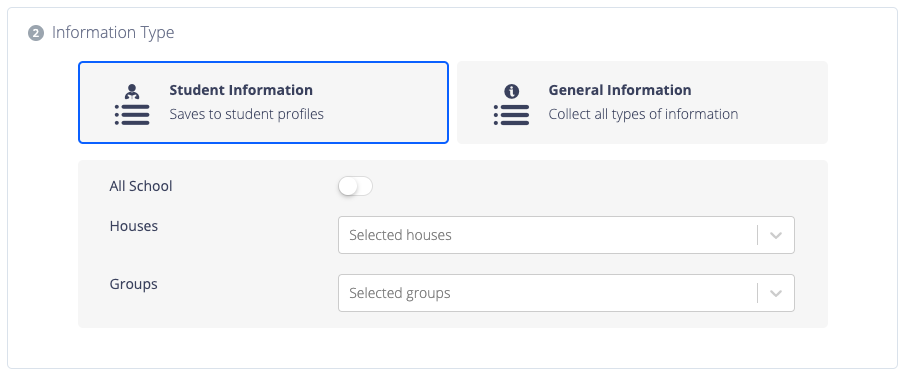
- In the Information Type section, select Student Information and specify the group that you have created earlier.
- Now, onto the Form Builder section. You can configure what you would like parents to review and provide information for. To preview your changes any time, click the Preview button.

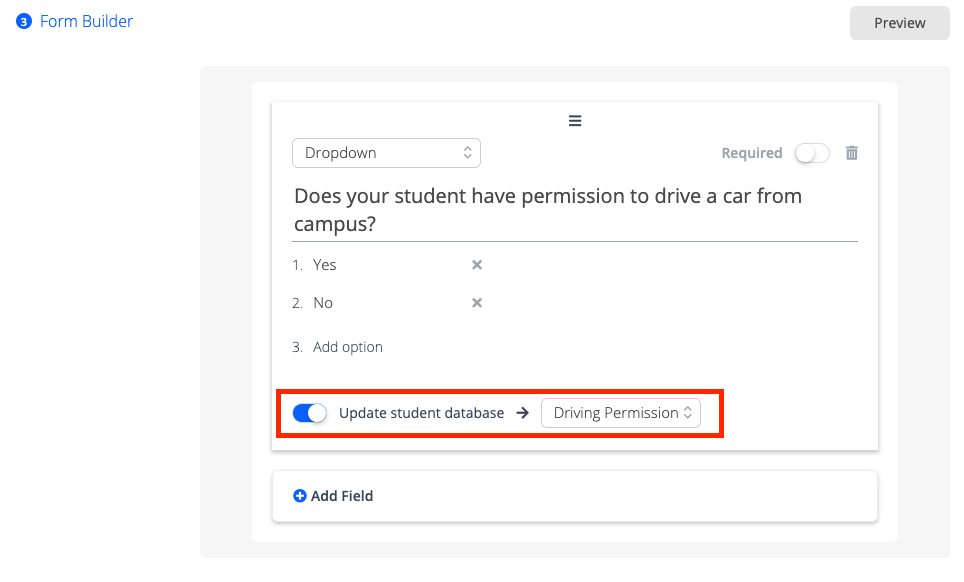
- Under Enter the title of this field, enter your question or the information you would like to gather. Select the type of your question. Here are some question types we offer: 1. Short answer, 2. Paragraph, for essay-length responses, 3. Number, 4. Radio button, where one response from many may be selected, 5. Checkboxes, where multiple items may be selected, 6. Drop down, where one can choose from a list, 7. Date, 8. Time, 9. File Upload, 10. Signature.
- To specify if people must answer the question, enable the Required toggle button.
- The answer provided by the parents can be automatically updated under the student's profile in the Student Database. To do that, enable the Update student database toggle button and select the custom field (which you had previously created).
4. Collect Responses
Now that the form is created, all there is left to do is send it to the recipients.
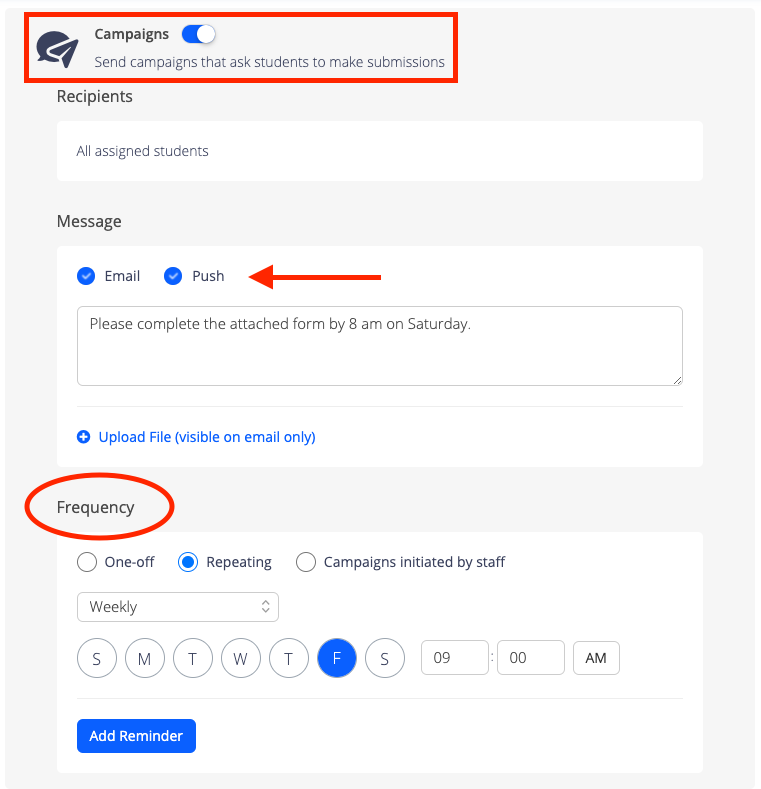
- Under the Submission Options section in the form builder, you can create a campaign that asks (and reminds) the students’ parents who have connected Orah accounts to complete the form.
- Set the frequency of the campaign as a one-off, repeating, or initiated by staff on an ad-hoc basis, depending on how often you want to collect submissions for this form.
- You can also write a custom message and attach any additional files within the email for their reference.
- Under the Permissions section, select who should have access to view the form responses. If you would like a confirmation message to be displayed after form submission or would like parents to perform any further actions depending on the answers they have provided in the form, configure the details under the Notifications section.
- Finally, click on the Save button, and the form is successfully on its way to people's inboxes.
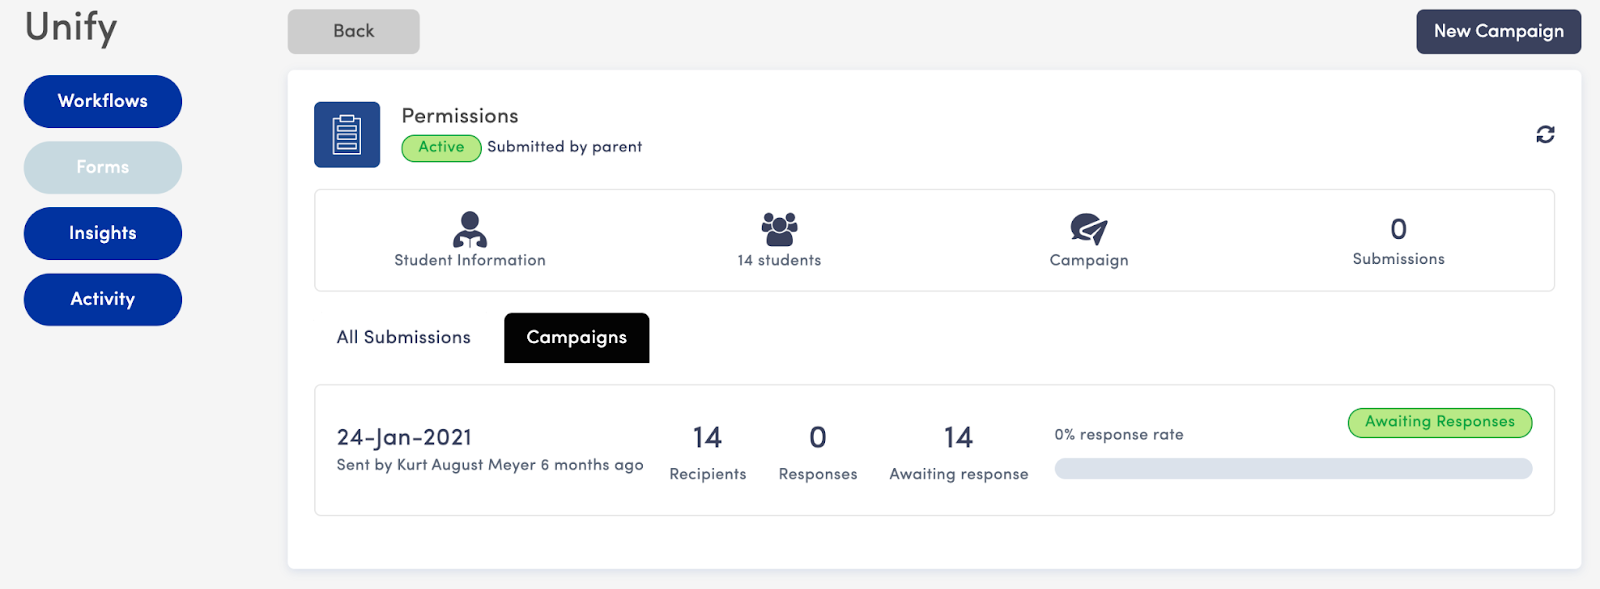
5. Review responses
Once the form has been sent, you can review the responses and easily find out who is yet to submit their answers. Here's how.
- Navigate to Unify and click on Forms.
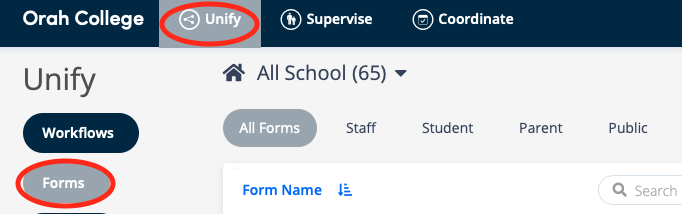
- All existing form templates will be visible. Click on the parents' tab to filter out the forms sent to parents.
- Click on the form for which you want to view responses and view all the submissions that have been made, listed by the most recent response.
- In order to view the responses for a particular campaign that was sent, click on the Campaigns tab. You can check which recipients have responded and who has not. From here, you can send reminders to those who have not yet responded.
If you have any further questions, feel free to write to us at support@orah.com. We are more than happy to help.
Download your guide to knowing where students are
When you sign up, we'll send you a guide detailing what it takes to setup your daily operations to maintain student location awareness using your routine school processes like attendance, student leave, late arrivals, early dismissals & emergencies. You'll also recieve an invite to join the Orah community and get the quarterly newsletter.


.png)


