Improve Your Schools Security Network With The Checkpoint Manager [New Feature]
Vincent Paget
•
January 10, 2018
A few months ago we released the first version of Checkpoint - an iPad application that schools can use to streamline the check-in/out process. Giving you a clearer understanding of where your students are in real-time.Over the past 5 years, keeping track of students movements has become a pressing issue for many schools. Poor record keeping and tracking practices have signalled the death of traditional analogue processes and clunky legacy software. Boardingware has been at the forefront of this change, helping schools to better track and account for their student's safety.Today, I’d like to introduce a natural extension to our Checkpoint application - The “Checkpoint Manager” - a place where administrators and technical stakeholders can remotely configure and monitor your checkpoint devices as you scale your tracking operations.
Why We Built Checkpoint
Boarding schools have evolved but the tools have not. 10 years ago, when there wasn’t much pressure to keep track of students, most schools would just record information with paper forms and primitive legacy products.Nowadays, students are living much more active lives, and schools are expected to know where their students are at all times.The problem is that our current tools for recording attendance and check-in/out are fundamentally broken. Paper-based processes and legacy products can’t keep up with the fast pace world of today. They’re prone to human error, disconnected from other systems and people, and time-consuming to manage.Here are the 3 biggest challenges they present:
- Too many errors. Accurate data is the foundation of any student tracking system. But making sure that your students are recording the right information every time they sign-in/out is a near impossible task. Especially because traditional analogue processes are prone to human error..This means boarding staff have to either supervise the sign-in/out process and make sure that the correct data is being recorded, or just accept that the information is likely to be riddled with mistakes and “hope” that nothing bad happens..
- Disconnected data creates uncertainty. When it comes to keeping track of your students, communication is key. But when your data is stored in several different locations and disconnected from each other, things start to get confusing. Staff don’t know what data they should trust, making it difficult to work together as a team..Residential and pastoral teams need a single, reliable source of information that they can rely on. Not a bunch of different datasets that just creates uncertainty..
- Relying on outdated information can lead to poor decision making. To work effectively, you need to be able to access real-time information when you need it, so you can make smart, informed decisions and react quickly to emergency situations. However, traditional analogue processes simply cannot provide you with that level of service.
A Modern Check-In Check-Out Solution
We think we’ve built a solution that solves all of these challenges. With Checkpoint, schools can set up a regulated process for students to sign themselves in-and-out. Then view the real-time information from the Boardingware Platform.Setting up Checkpoints at your school is absurdly simple, and with this latest release, it’s also insanely easy for your administrators and technical stakeholders to remotely manage and monitor their configuration and operational status.Here’s how it works.
1. Capture Accurate Information
Instead of relying on students to record the correct information every time they sign in/out, Checkpoint allows you to take control of the process. This is done in two ways.The first step is to create custom leave types. This will ensure that you are recording all the information you need, every time someone signs-in/out.With leave types, you can set mandatory fields to ensure you’re collecting the right information every time, restrict destinations so students can only sign-out to places that they have permission for, and set rules to restrict availability during certain time periods.All this means you don’t have to worry about dirty data creeping into your processes.Download our“Definitive Guide to Leave Types and Best Practices” to learn more about the power of leave types.[caption id="" align="aligncenter" width="600"]
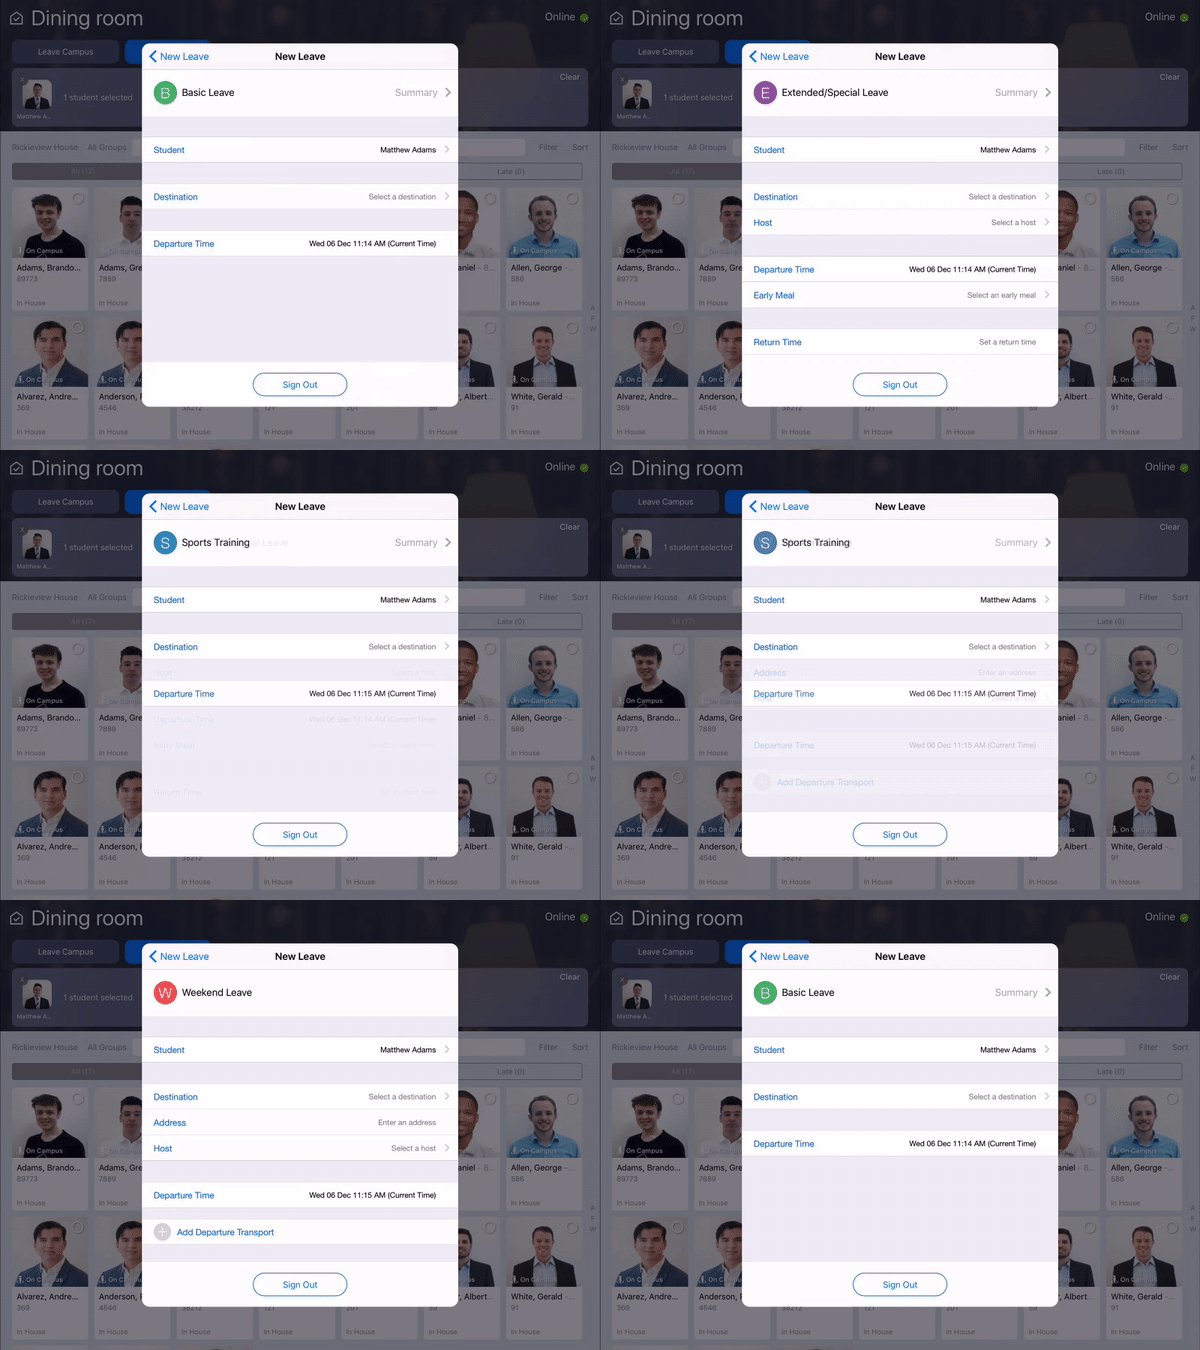
Custom leave types allow you to record all the information you need every time your student's signs in/out[/caption]Once you’ve set up your leave types, the next step is to configure how your students use the Checkpoint devices to sign-in-and-out. This is where you can manage things like privacy concerns, access permissions and authentication requirements.Here are the settings that you can use to configure each Checkpoint:
- Assignments - Define which students have permission to use a particular checkpoint..
- Appearance - Change the background image of your Checkpoint to suit your destination and school brand..
- Display - Choose to display your Checkpoint in a Tile View with all your students visible, or in a Faceless view that hides student profiles for added privacy..
- Peer SI/SO - Sign out groups of students at the same time. Handy for when you need to sign out a group to the same destination..
- Viewing Permissions - Provide access to view the details of a student's active leave by pressing and holding their profile in the tile view..
- Authentication - Require students to enter their unique pin-code for authentication protocols..
[caption id="" align="aligncenter" width="600"]
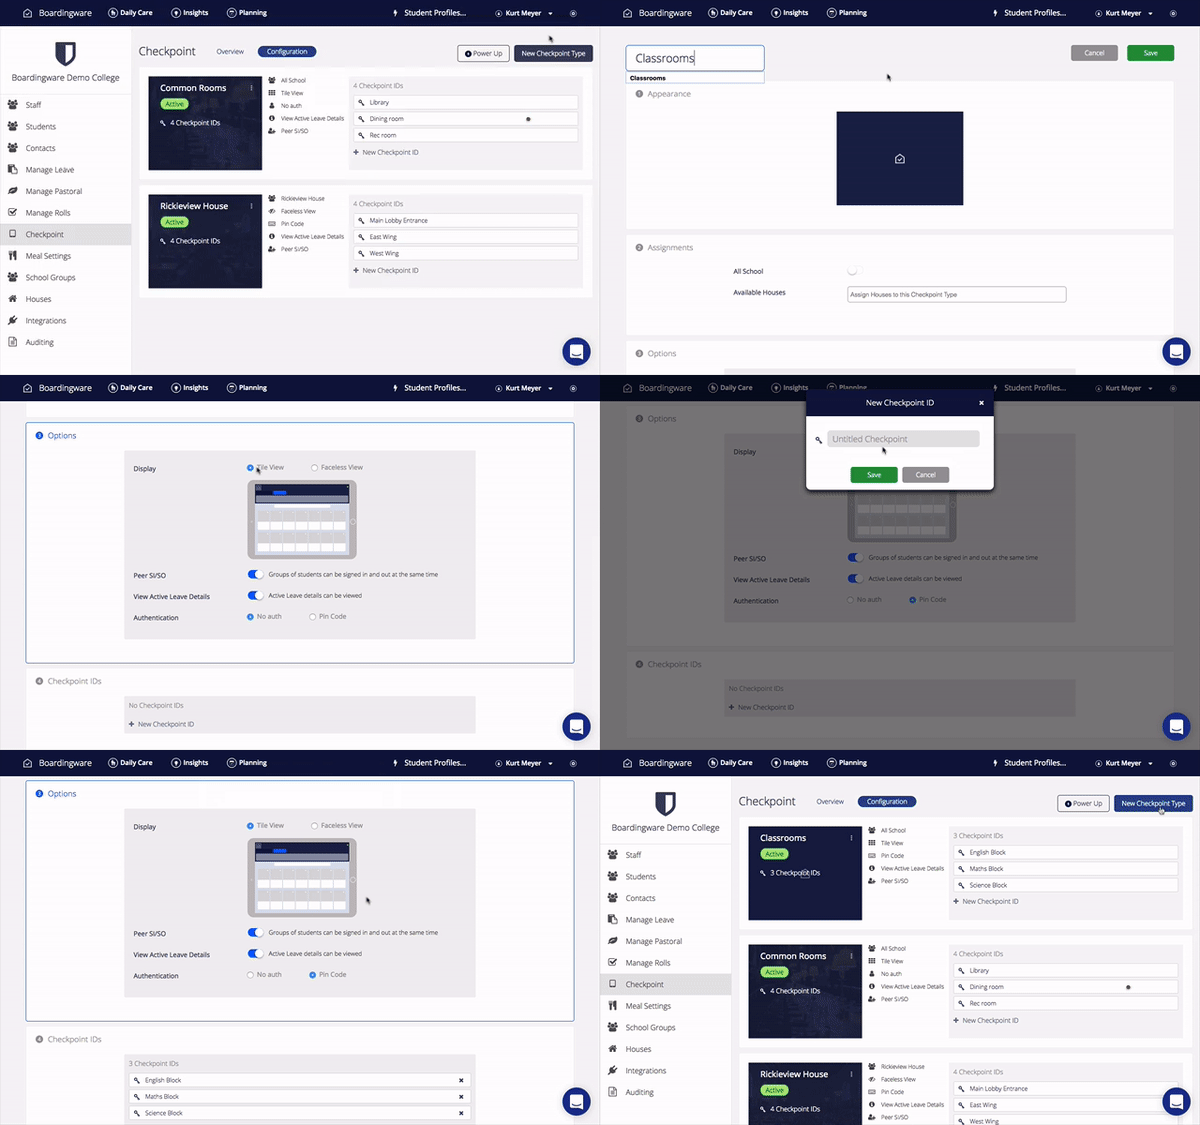
Now you can remotely manage the configuration of all your Checkpoints from one place[/caption]In this latest release, we’ve also given you the power to remotely control the configuration of all your Checkpoints from one place. Now you can create different configuration types and assign them to your different Checkpoint locations.This means every time you make a change to a Checkpoint type, it will update the configuration of all the Checkpoints that are assigned to it. Making it really easy for you to manage how your Checkpoints are set up.
2. Automatically Consolidate All Your Information
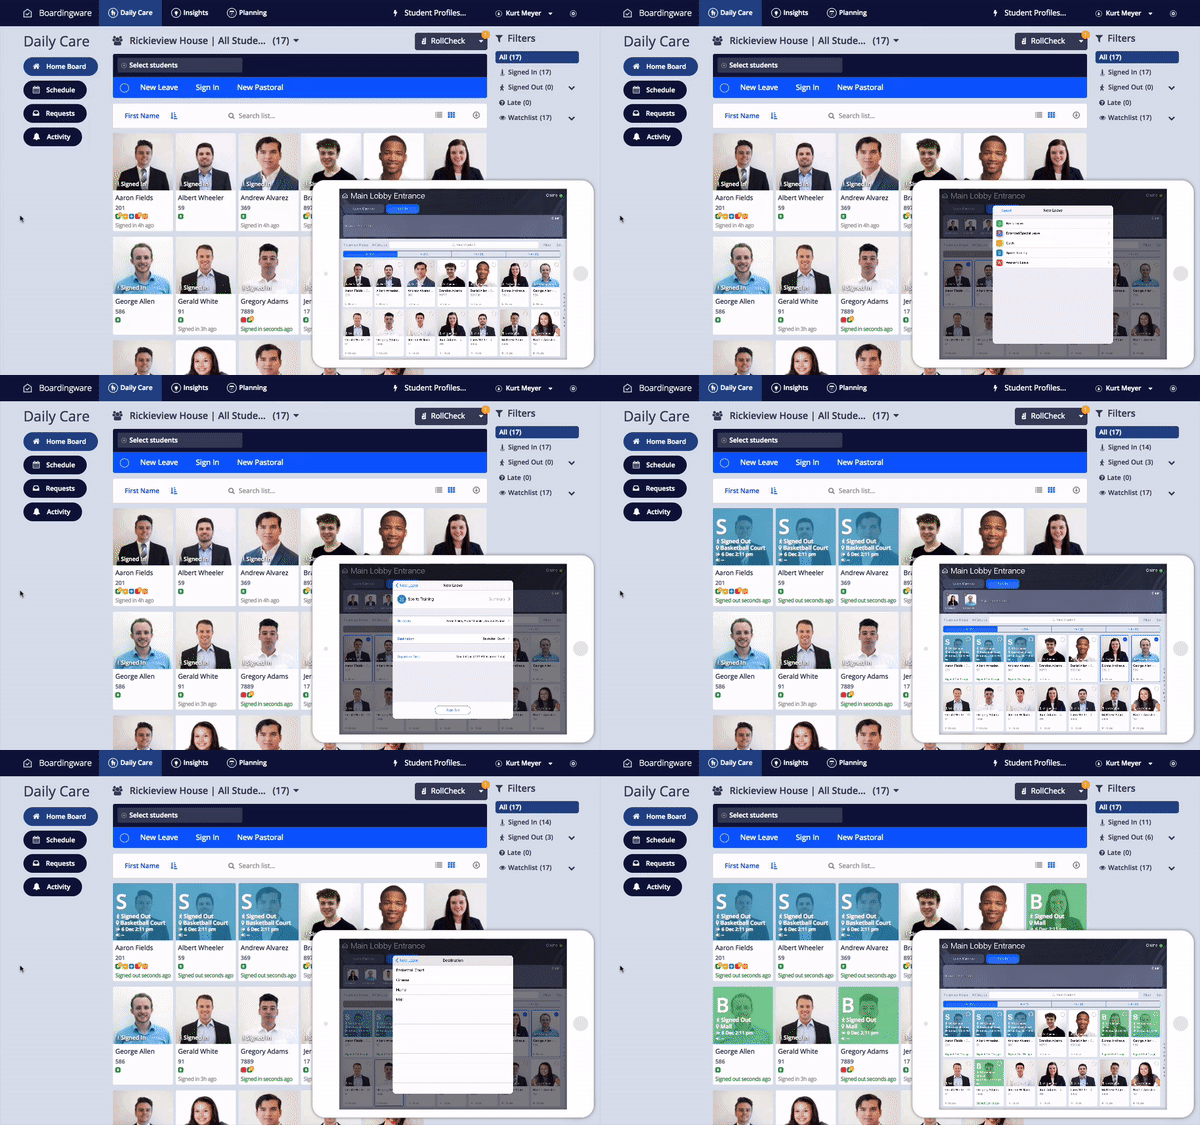
Once you’ve started collecting the right information, you need a way to consolidate and share it with the rest of your team.With Checkpoint, all the data that you capture is automatically synced with the Boardingware platform for your staff to access at any time. This eliminates any confusion and gives your residential and pastoral teams a single source of truth for all your student tracking information.Plus, everything is updated in real-time so you can confidently account for your students in an emergency situation.[caption id="" align="aligncenter" width="600"]
Automatically update your student tracking information in real-time[/caption]
3. Scale and Monitor Your Checkpoint Network
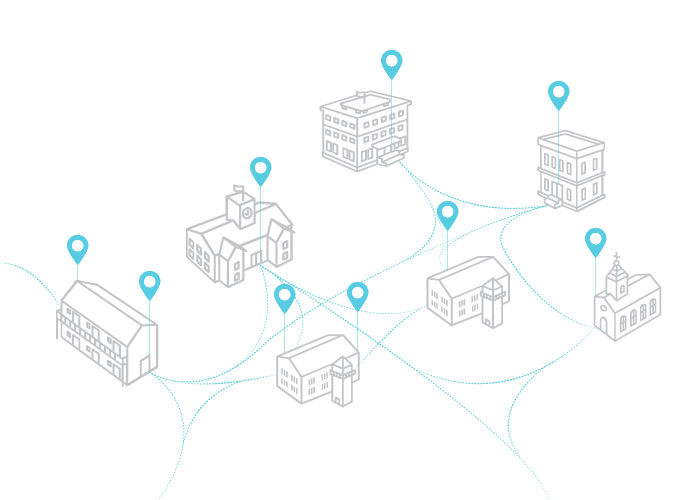
While giving your students the ability to sign themselves in and out is great, the real value of Checkpoint lies within the data that you are able to collect...And the real power comes when you start to scale your Checkpoint network.Having multiple Checkpoints spread out around campus will give you greater visibility into your student’s actual activity and provide you with more credible and robust tracking information that you can rely on.In short, the more Checkpoints you set up, the more accurate and valuable your data will be.[caption id="" align="aligncenter" width="700"]

Setting up multiple Checkpoints around your school grounds will provide you with more accurate and valuable data. (image credit: parkjisun from Noun Project)[/caption]However, when you start to increase the number of Checkpoints you have, it can get harder to manage and monitor their operational status.Depending on your school's wifi network, some Checkpoints may occasionally lose connection, which can affect your tracking processes.That’s why we built a real-time dashboard so you can monitor your Checkpoints activity in real-time. The purpose of this dashboard is to help administrators and technical stakeholders monitor unexpected offline activity and session events.[caption id="attachment_2108" align="aligncenter" width="600"]

Monitor your Checkpoint Network with a live dashboard[/caption]In the overview dashboard, there are 3 main sections that give you insight into your Checkpoints operational activity.Live Activity.This section tells you which Checkpoints are currently online and offline. From here you can click to view more detailed information and end sessions remotely if needed.To help you stay on top of offline events, you can also set up “Email Alerts” to receive notifications as soon as a Checkpoint goes offline so you can resolve the situation right away.Error Log.This section provides you with a historical record of all the errors that have occurred with your Checkpoints. The "Error Log" records “offline” and “logged out” events that you can review to troubleshoot any technical issues that you may encounter.Map View.When you start to scale your Checkpoint network, it can get difficult to remember which one is which. The map view gives you a visual way to locate all your different Checkpoints and colour-coded markers help you to quickly identify any offline issues.
How to get started with Checkpoint
Checkpoints are a powerful tool for capturing information about your student's movements, and with this latest release, we’ve also made it a lot easier for your IT department and residential stakeholders to maintain as you scale and tighten your tracking processes.If you’re a current customer, you will be able to access the new “Checkpoint Manager” from the School Management section. Here are some handy links to help you get started:
If you’re new to Boardingware and would like to get a closer look at how Checkpoint could help you, click the link below to schedule your own personal demonstration.
[maxbutton id="1" ]
Download your guide to knowing where students are
When you sign up, we'll send you a guide detailing what it takes to setup your daily operations to maintain student location awareness using your routine school processes like attendance, student leave, late arrivals, early dismissals & emergencies. You'll also recieve an invite to join the Orah community and get the quarterly newsletter.


.png)
.png)


